Side on wall slide
The side-on wall slide trains lifting the arm up and overhead with the elbow bent, on a diagonal between straight forward and out to the side, using the wall as a guide. You stand with the working side next to a wall, rest the little-finger edge of your forearm and hand on it with the palm facing forward, and slide the forearm straight up the wall until the hand is well above your head, then back down. The wall keeps the arm on a steady track, which helps when a shoulder is stiff or relearning control after an injury.
How to do the side on wall slide
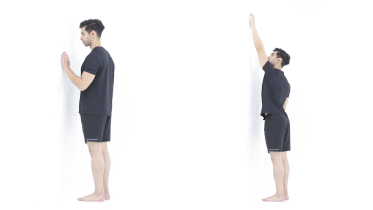
- Stand tall with the working side to a wall, about a hand's width between your side and the wall, feet about shoulder width apart.
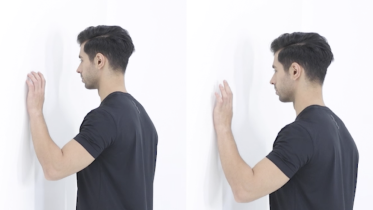
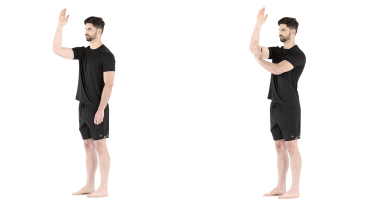
- Bend the elbow to about a right angle and turn the forearm out so the little-finger edge of your forearm and hand rests on the wall, palm facing forward. In the video the elbow starts near your side with the hand at about waist height.
- Keeping the elbow bent, slide the forearm straight up the wall so the upper arm lifts forward and out to the side at the same time, on a diagonal. Partway up, the elbow is level with your shoulder and the forearm points straight up the wall.
- Carry on only as high as is comfortable. In the video the elbow ends above shoulder height, still bent, with the hand well above the head.
- Slide back down slowly along the same line to the start, keeping light contact with the wall.
What you should feel
Work at the front, top and back of the shoulder and around the shoulder blade, and possibly a mild stretch across the front of the shoulder and chest near the top of the slide.
Common mistakes
- Hitching the shoulder up toward your ear as the hand climbs.
- Leaning your body into the wall or arching the lower back to get higher.
- Letting the forearm come away from the wall, or straightening the elbow, so the arm swings free.
- Dropping the arm back down quickly instead of sliding it.
How often
Many programs use 1 to 3 sets of 10 to 15 slow slides, once or twice a day, going higher only while it stays comfortable. Your physio will adjust this.
Stop and check with your physio if
- A sharp pain, pinch or catch at the front or top of the shoulder as the hand rises.
- The shoulder feels as though it could slip out, most often once the upper arm is level with your shoulder or higher.
- Pain, pins and needles or numbness spreading down your arm or into your hand.
- Pins and needles in your arm or hand that do not go away after you stop, or part of your arm or hand goes numb. Get medical advice the same day. If one side of your face or body suddenly goes numb or weak, or your speech becomes slurred or muddled, call emergency services, even if it goes away.
- A sudden pop or tearing feeling in the shoulder that brings sharp pain, new weakness or trouble lifting the arm. Stop and contact your surgical team the same day, or get medical advice the same day if you have not had surgery.
- The shoulder feels as if it has slipped out of place, looks a different shape or suddenly locks so you cannot move the arm, or your hand turns cold, pale or blue. Go to an emergency department straight away, without driving yourself, and do not try to put the shoulder back in yourself.
From the clinic
The app lists this as a forward lift (flexion), and the voice guide calls it that too. In the video the upper arm rises on a diagonal, partly forward and partly out to the side, with the elbow bent and the forearm pointing up the wall, so the steps follow the video. The wall slide, done facing the wall with a towel under the hand, trains the forward lift. If your skin sticks to the wall, a small towel under the forearm helps it glide.
With the upper arm raised partly out to the side and the forearm pointing up the wall, the shoulder moves close to the position in which a joint that has come out at the front before is most likely to slip out again. After any dislocation, even one years ago, or if your shoulder has ever felt unstable, check with your physio first and go only as high as they advise.
After shoulder surgery, including a rotator cuff repair, or after a shoulder fracture or dislocation, follow your surgeon's or physio's plan, and do only the movements and range they have cleared. Many plans allow only passive movement at first, where the arm is moved for you and its muscles stay relaxed. Your own muscles move the arm here, with the wall only guiding it, so check you are cleared for active movement before you start. Turning the arm outward, as here, is often limited for a while after a repair for a shoulder that kept coming out at the front, a repair of the tendon at the front of the shoulder (subscapularis) or a shoulder replacement, so check this movement is on your plan.
When this feels easy, wall angels take both arms through a similar out-to-the-side path with your back to the wall. Lying 90 90 shoulder rotation works on the outward turn with the floor supporting the arm.
Written and checked by the PocketPhysio editorial team. Last updated 2026-09-28.
This page is general education, not a diagnosis or a personal treatment plan. If you have pain, an injury or a health condition, see a physiotherapist or doctor before starting new exercises.